British Interior Design: Master Timeless Elegance and Heritage Styling for Your Home in 2026
British interior design isn’t about following trends, it’s about embracing understated elegance, quality craftsmanship, and layered sophistication that stands the test of time. Whether you’re drawn to the refined restraint of Georgian homes, the warmth of cottage aesthetics, or the tailored comfort of contemporary British style, this design approach rewards thoughtful choices and intentional spaces. The beauty of British interior design lies in its refusal to shout: instead, it whispers confidence through well-chosen materials, balanced proportions, and a respect for heritage mixed with practical living. If you’re ready to bring this timeless sensibility into your own home, we’ll walk you through the fundamentals and show you exactly how to execute it, room by room, with projects you can tackle yourself.
Key Takeaways
- British interior design emphasizes understated elegance and quality craftsmanship over trendy maximalism, creating timeless spaces that whisper confidence through balanced proportions and heritage materials.
- Layering textures, materials, and thoughtfully placed accessories builds sophistication in British interiors, allowing neutral foundations like creams and soft grays to showcase wood, stone, and fabric beauty.
- Furniture layout should prioritize conversation and comfort by floating seating groups, positioning side tables within arm’s reach, and avoiding cold wall-hugging arrangements that break the lived-in aesthetic.
- DIY projects like installing picture rails, painting dado rails, and creating styled bookshelves deliver significant impact without requiring a designer and can be completed in a single day.
- British interior design in each room—from dining tables centered with proper lighting to layered bedroom bedding to kitchen open shelving—honors both heritage architectural details and practical, functional living needs.
Understanding British Interior Design Fundamentals
Key Characteristics of British Style
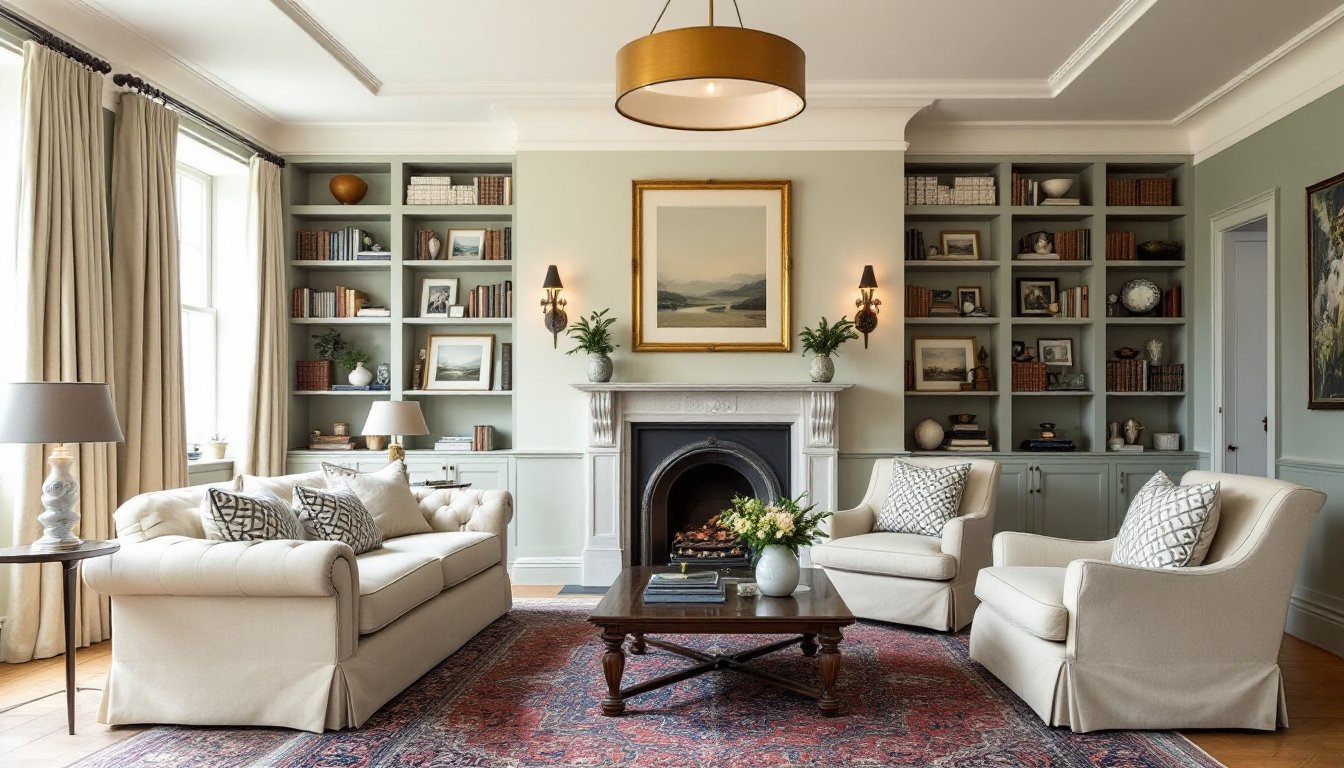
British interior design stems from a philosophy of understated luxury and practicality. You won’t find maximalist patterns or bold color-blocking, instead, you’ll notice restraint, balance, and an almost invisible attention to detail. The style values heritage materials: solid wood, natural stone, quality textiles, and genuine leather. Nothing feels cheap or trendy: everything looks as though it could last another 50 years without appearing dated.
A core hallmark is layering. British interiors build depth through texture, material variety, and thoughtful accessory placement rather than visual loudness. You might see a neutral sofa paired with patterned throw pillows, a traditional rug, and antique-looking side tables, all working together in a conversation rather than competing for attention. Comfort meets formality, rooms feel lived-in yet polished.
Proportions and symmetry matter. Fireplaces often anchor rooms, windows are dressed with classic treatments like shutters or simple drapes, and furniture placement follows balance rather than cramming. This isn’t about rigid rules: it’s about visual harmony that makes a space feel intentional without feeling fussy. Sources like Elle Decor showcase how contemporary designers blend these principles with modern living needs.
Creating Sophisticated Living Spaces with Classic British Elements
Furniture and Layout Strategies
British furniture design favors quality over quantity. A single solid wood dining table in walnut or oak, paired with upholstered chairs, outweighs a room full of cheaper pieces. Look for furniture with visible joinery, mortise and tenon joints signal honest craftsmanship. Leather Chesterfield sofas, wingback chairs, and rolled-arm seating are icons: they’re comfortable, durable, and look better as they age.
Layout follows function and flow. Arrange seating to encourage conversation: sofas facing each other across a low coffee table, wing chairs pulled slightly forward, side tables positioned within arm’s reach for drinks or reading glasses. Avoid pushing all furniture to walls, that creates a cold, unused-looking room. Instead, float seating groups in larger spaces to define distinct zones: a reading nook by a window, a conversation area near a fireplace.
Incorporate case goods with real paneling, glass doors, or deep storage. Bookcases filled with books (spines showing, not just decorative objects) and family photographs feel authentically British. Open shelving works if styled carefully, cluttered shelves break the aesthetic. For practical layout inspiration, explore Interior Design Archives covering diverse styles and spatial solutions.
Color Palettes and Wall Treatments
British color schemes favor muted, sophisticated hues: creams, soft grays, warm whites, sage green, deep navy, burgundy, and warm earth tones. Whites and creams form the backbone, preventing rooms from feeling dark or heavy even though the often-cloudy UK climate. These neutrals also showcase the beauty of wood, stone, and fabric textures.
Pattern introduces interest without chaos. Traditional choices include damask, toile, florals, and ticking stripes, but in restrained colorways. A single feature wall in William Morris wallpaper (geometric florals in muted colors) or a subtly patterned dado rail creates impact without overwhelming. Keep pattern mostly to textiles: curtains, upholstery, throw pillows, and rugs. This allows flexibility when you need to refresh.
Wall treatments honor architectural details. Dado rails (horizontal moldings dividing the lower and upper wall) are quintessentially British and surprisingly achievable as a DIY project: measure the height (typically 36 inches from the floor), snap a chalk line, then secure 3/4-inch hardwood molding with adhesive and brad nails. Paint below the rail a different color or paper it for contrast. Above, paint or wallpaper in a lighter shade or add wallpaper with smaller-scale patterns. This visual break adds sophistication and actually protects walls from chair scuffs, a practical heritage touch.
Incorporating British Design Into Different Rooms
Each room benefits from the British approach, though each has its own character. In dining rooms, center a substantial wooden table with properly fitted chairs (upholstered seats are more comfortable than hard wood for long meals). Add a sideboard for serving and storage: British dining is as much about the ritual as the food. Hang a chandelier or pendant lights at the right height, typically 30 to 36 inches above the table surface.
Bedrooms embrace comfort and privacy. Layer bedding: quality cotton sheets, a wool blanket, a quilted bedspread, and several throw pillows in coordinating patterns. Use a padded headboard or upholstered bed frame. Keep the color palette soft to encourage rest, creams, soft blues, pale greens. Nightstands should have drawers for practical storage. Window treatments are typically lined curtains (blackout or thermal lining) that frame windows cleanly without excessive gathering.
In kitchens, British style means open shelving displaying everyday ceramics, a large farmhouse or painted wooden table for eating, and cabinetry in soft grays, creams, or sage tones rather than high-gloss modern finishes. Details matter: exposed brick if you have it, vintage-style hardware, and practical worktops (granite, wood, or quality laminate) that age gracefully.
Living rooms anchor the home. Arrange seating for conversation, add a fireplace surround if possible, display books and family photographs, and layer lighting: overhead fixtures, floor lamps, and table lamps create warmth. One statement piece, a striking rug, an antique mirror, or a carefully curated bookshelf, gives the room character without clutter. Architectural Digest frequently features these room-by-room applications in contemporary British homes.
DIY Projects to Achieve British Interior Style
You don’t need a designer to infuse British character into your home. Several manageable projects deliver impact.
Project 1: Install Picture Rails and Hang Artwork
Picture rails, narrow molding running horizontally near the ceiling, let you hang artwork without drilling multiple holes. This is distinctly British and incredibly practical.
- Measure 12 inches down from the ceiling and snap a chalk line around the room.
- Locate wall studs with a stud finder: mark them lightly.
- Use 2-inch finish nails driven through 3/4-inch hardwood molding into studs every 16 inches (standard stud spacing).
- Use a miter saw to cut precise 45-degree angles at inside and outside corners for a professional look.
- Fill nail holes with wood filler, sand smooth, and paint to match your walls.
- Hang artwork using wire and hooks rated for the weight of your frames.
Project 2: Paint a Dado Rail
Already discussed above, this project typically takes one day and dramatically upgrades a room’s sophistication.
Project 3: Refinish or Upholster Existing Furniture
If you have old wooden chairs, transform them with new upholstery or a fresh stain. Strip old finish with 120-grit sandpaper, stain with dark walnut or English oak (mid-range options are often indistinguishable from premium brands), and seal with matte polyurethane. For upholstery, remove old fabric, add fresh batting if needed, and staple new fabric (linen or linen-blend) with a pneumatic staple gun. YouTube tutorials abound, take time learning proper stapling technique before starting.
Project 4: Create a Bookshelf Display
Assemble or refinish floating shelves (24 inches is a good depth for books and objects). Anchor them securely into studs with L-brackets rated for 50+ pounds per shelf. Style by grouping books by color or subject, leaning some horizontally, and positioning small objects, framed photos, vintage finds, ceramics, between stacks. This takes an afternoon but elevates an entire room. Explore design tools and spatial planning if you want to preview layouts digitally first.
Safety Notes: Always wear safety glasses when cutting molding or hammering. Use a dust mask when sanding or cutting wood. If removing old paint or stain, check for lead paint in older homes (common before 1978 in the US) and follow EPA guidelines for safe removal. For electrical work involving lighting fixtures, turn off power at the breaker and test wires with a voltage tester before touching.