![]()

How to Create an Interior Design Concept Board That Actually Sells Your Vision
A concept board is your best friend when planning any interior design project, whether you’re refreshing a single room or overhauling your whole house. Before you spend money on paint, furniture, or fixtures, a well-crafted board lets you visualize the full picture, test color combinations, and communicate your ideas to family members, contractors, or designers. It’s also cheaper and faster than guessing. In this guide, you’ll learn exactly how to build a concept board that feels cohesive, looks professional, and actually solves design problems instead of creating them.
Key Takeaways
- An interior design concept board is a physical or digital visual collection of materials, colors, textures, and actual product samples that prevents costly design mistakes by showing how all elements coordinate before purchasing.
- Concept boards catch incompatibilities early—revealing whether colors, finishes, and materials work together so you avoid expensive errors like mismatched flooring and cabinetry.
- Build your concept board using gathered inspiration images, organized color swatches, finish samples (flooring, paint, hardware, fabric), and arrange them in a logical layout that tells a cohesive design story.
- A well-arranged concept board serves as a communication tool with contractors, designers, and family members, eliminating guesswork and providing a concrete shopping list with specific product names and colors.
- Step back and view your concept board from 6 feet away to ensure colors feel balanced and no single element unintentionally dominates—your design should feel intentional before moving forward with purchasing and installation.
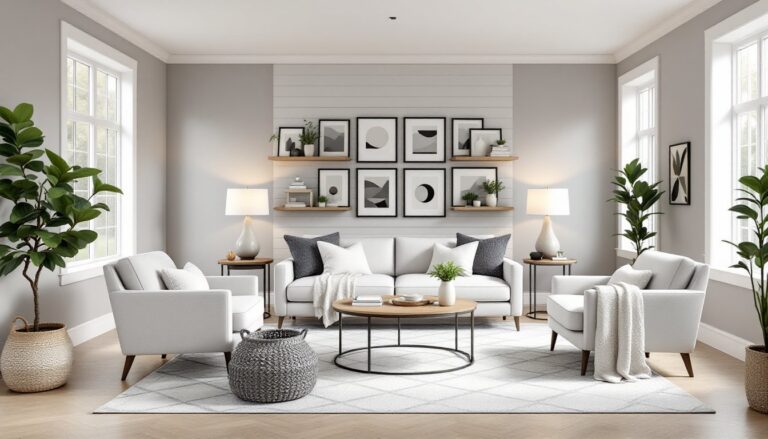
What Is an Interior Design Concept Board?
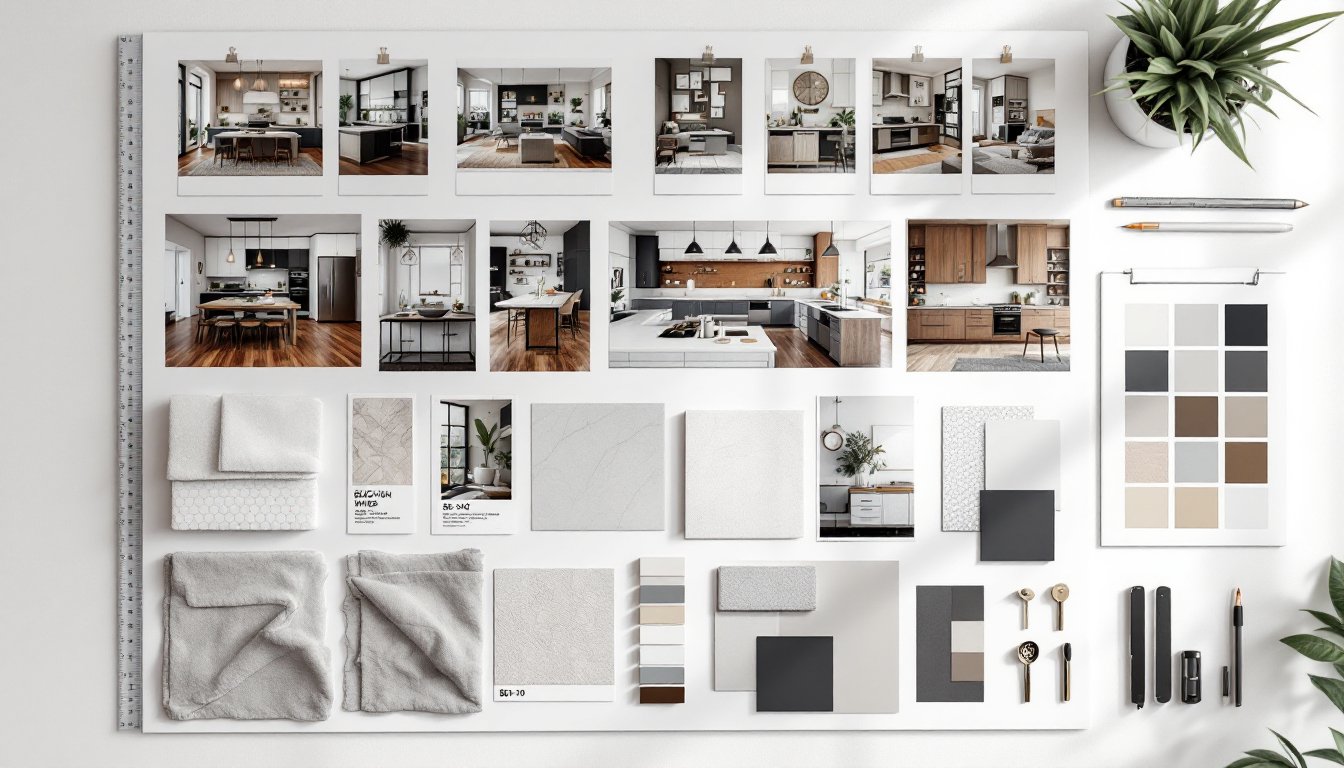
An interior design concept board is a visual collection of materials, colors, textures, and images arranged together to show how a space will look and feel. Unlike a mood board (which is looser and purely inspirational), a concept board includes actual samples, paint swatches, fabric scraps, flooring materials, hardware finishes, and photographs of furnishings, all in one organized layout.
Think of it as a physical mockup of your design decisions. A concept board might measure anywhere from 12″ × 18″ to 24″ × 36″ (or larger for complex projects). It combines:
- Color palettes and swatches
- Flooring and wall samples
- Fabric and upholstery textures
- Cabinet finishes and hardware
- Lighting fixtures or images of them
- Decorative accessories and art styles
- Photographs of furniture pieces you plan to use
The board serves as a contract between you and your vision. When you’re standing in a paint aisle surrounded by 47 shades of beige, a concept board keeps you honest.
Why You Need a Concept Board Before Starting Your Project
Most DIY design mistakes come from making decisions in isolation. You pick a paint color in the store, a backsplash tile at the home center, and flooring online, then nothing works together. A concept board prevents this by forcing you to see all elements at once.
Here’s what a concept board actually does for you:
Catches incompatibilities early. That paint color might look great on the swatch, but when you pin it next to a cool-toned granite sample, you realize it’s too warm. Better to discover this now than after two coats on the wall.
Saves money. Concept boards help you avoid expensive mistakes like ordering floor tile that clashes with cabinetry, or choosing a backsplash that looks dated next to your countertops.
Clarifies your vision. When you’re scrolling through design inspiration online, everything looks good. A board forces you to commit to specific products and see how they actually coordinate.
Communicates with others. If a contractor, designer, or family member needs to understand your direction, a physical or digital concept board is worth a thousand descriptions. Professionals often refer to interior design presentation boards as essential tools for this exact reason.
Helps with purchasing decisions. When you’re ready to buy, you have a shopping list with actual product names, colors, and finishes, no guessing.
Essential Materials and Tools You’ll Need
You don’t need fancy equipment. Most of what you need is simple and inexpensive.
For a Physical Concept Board:
- Backing board: Foam core, mat board, white poster board, or cork board (sizes typically 11″ × 14″ to 24″ × 36″). Foam core is lightweight and easy to cut: cork board lets you pin items.
- Paint swatches: Get actual color chips from hardware stores (most are free). Request 8″ × 10″ sample sizes if available.
- Material samples: Ask suppliers for offcuts of flooring, tile, stone, or fabric. Tile shops, flooring stores, and fabric retailers usually hand these out at no cost.
- Hardware samples: Cabinet hardware, door handles, and faucet finish samples from home improvement stores.
- Adhesives: Spray adhesive, glue stick, or painter’s tape (if you want to rearrange items without permanent mounting).
- Scissors or craft knife: For trimming and cropping images.
- Ruler and pencil: For layout planning.
- Photos and magazine cutouts: Images of furniture, lighting, and decor that inspire your style. MyDomaine and design blogs are great sources.
For a Digital Concept Board:
- Canva, Pinterest, Adobe XD, or design software like SketchUp. Digital boards work well if you’re sharing designs remotely or prefer a cleaner presentation.
- High-quality photos of all your materials scanned or photographed with consistent lighting.
- A color picker tool to match actual product colors in your digital mockup.
Step-by-Step Guide to Building Your Concept Board
Gather Inspiration and Reference Images
Start by collecting images that make you feel something, sofas you love, color combinations that stop you mid-scroll, room layouts that make sense, lighting styles, texture combinations. Save at least 10–15 images.
Next, identify the common threads. Do most images share cool or warm tones? Is there a dominant style (modern, rustic, transitional, eclectic)? Are certain materials recurring (wood, metal, concrete, upholstery)? These patterns form your design direction.
Don’t skip the practical step: measure your actual room and note permanent features like doors, windows, outlets, and built-ins. Your inspiration board needs to account for reality, you can’t ignore that north-facing window that affects your lighting strategy.
Organize Your Color Palette and Finishes
This is where the board becomes concrete. Pick your dominant color (usually 60% of the palette), a secondary color (30%), and accent colors (10%). Get actual paint swatches in these colors and tape or glue them to your board.
Now add your finish samples in order:
- Flooring sample (if you’re replacing it)
- Wall color swatch (or wallpaper sample)
- Countertop or backsplash tile
- Cabinet finish or stain
- Hardware finish (polished nickel, brushed bronze, etc.)
- Fabric samples for upholstery, curtains, or rugs
- Paint or finish swatches for trim and accents
Arrange these in a logical flow. Don’t just scatter them. Group similar materials together so you can see relationships. For example, place your flooring next to your wall color to check contrast. Pin your hardware next to cabinet samples to verify they complement each other.
As you organize, ask yourself: Do these finishes feel cohesive? Does the metal finish match your style direction? Would a different cabinet color work better with this flooring? This is your moment to troubleshoot before spending money.
Arrange and Assemble Your Final Layout
Decide on a layout that tells a story. Many designers arrange boards in zones:
- Top row: Color palette and inspiration images
- Middle row: Large material samples (flooring, wall color, major finishes)
- Bottom row: Smaller items (hardware, accent colors, decorative items)
Alternatively, create a room-by-room layout if your project spans multiple spaces. Or arrange by design element: walls, floors, cabinetry, textiles, accessories.
Once items are positioned, step back and look at the board from 6 feet away. The way it reads from a distance matters. Colors should feel balanced. No single element should visually dominate unless that’s intentional (like a feature wall).
If you’re using spray adhesive or glue, work in a well-ventilated area. Apply adhesive to the back of each item, then press it firmly onto the board. Use painter’s tape if you want to test the layout first without committing.
For a digital board, use top interior design apps for iPad or web-based design tools to arrange photos of your materials in a clean, organized grid. Digital boards are easier to share via email or text, which is useful if you need feedback from a designer or contractor.
Final check: Does the board feel intentional? Can you explain why each item is there? If you’re second-guessing something, move it or swap it out. This board is your guide, it should feel right before you move forward with purchasing and installation.